Knife work remains a notoriously tedious and time-consuming part of daily meal prep. Many home cooks eventually turn to kitchen gadgets to speed up this process. Unfortunately, poorly made devices often create more frustration than they actually solve. Dull blades smash ingredients, and flimsy plastic hinges snap under basic pressure.
A high-quality Vegetable Chopper provides an excellent solution for faster, highly uniform food prep. This convenience only holds true if you select a model built for real-world kitchen tasks. You need a device strong enough to handle tough produce. It also must clean up faster than traditional hand chopping.
This guide serves as an objective, hype-free breakdown of these popular kitchen tools. We will show you how to evaluate, shortlist, and choose the right device. You will learn to match specific models to your personal budget, weekly prep volume, and everyday kitchen reality.
Key Takeaways
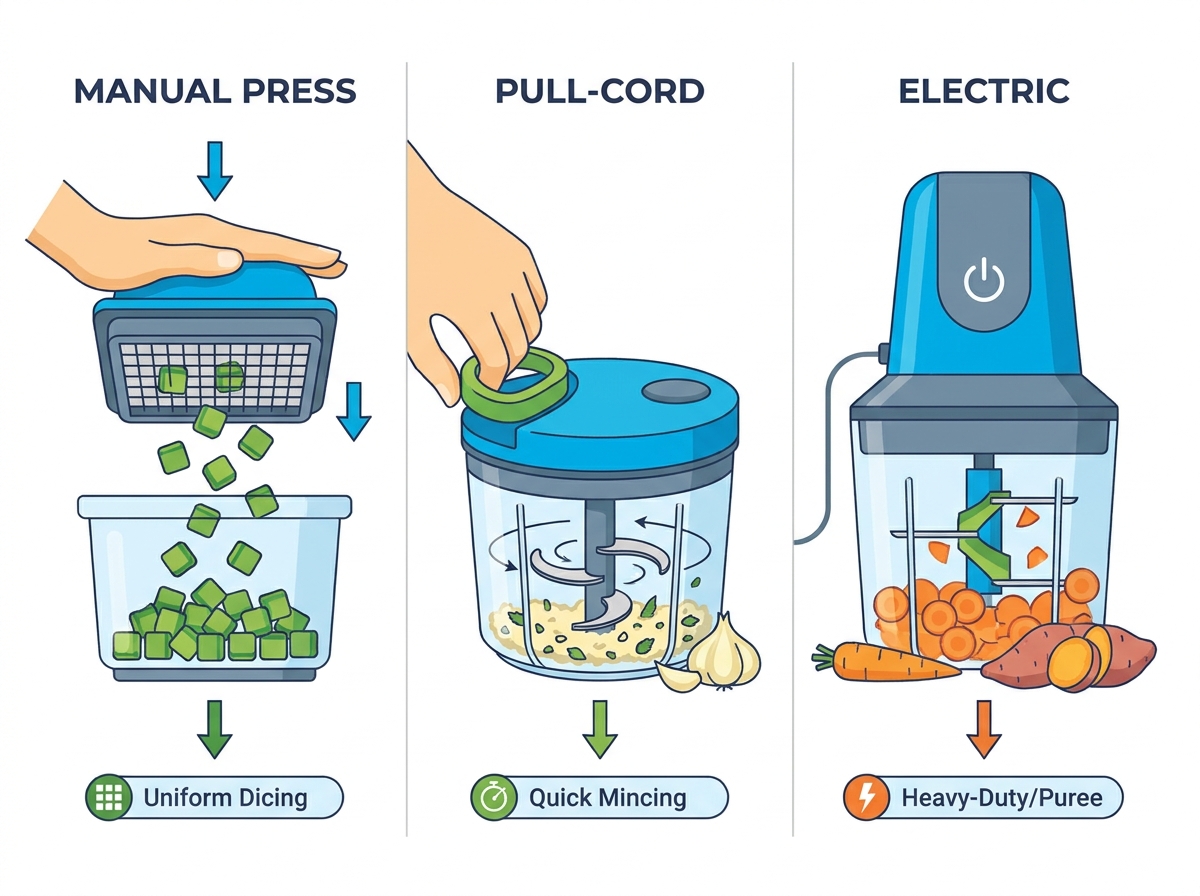
- Mechanism Matters: Manual press choppers excel at dicing, pull-cord choppers are best for mincing, and electric choppers handle tough root vegetables and purees.
- The Cleaning Trade-off: A chopper is only a time-saver if it is genuinely easy to clean; models with included grid brushes and top-rack dishwasher-safe parts are non-negotiable.
- Budget Reality: High-quality, BPA-free manual choppers can be secured for under $30, while premium multi-blade or electric systems range from $40 to $70+.
- Expectation Management: No vegetable chopper eliminates knife work entirely; large produce still requires quartering before processing to prevent hinge damage.
Why Upgrade to a Dedicated Vegetable Chopper?
Many culinary purists question the need for specialized slicing gadgets. They often argue a good chef's knife handles everything perfectly. While mastering knife skills is valuable, it takes years of daily practice. Most busy people simply want dinner on the table quickly. We must look at the specific scenarios where a dedicated chopping device easily outperforms traditional methods.
- High-Volume Meal Prep: Processing ten onions by hand takes significant time and energy. A press-style device reduces this workload to mere minutes.
- Limited Hand Dexterity: Conditions like arthritis make prolonged knife usage painful. Ergonomic chopping tools require far less grip strength.
- Tear-Free Dicing: Enclosed catch trays contain volatile sulfur compounds. You can finally dice onions without crying.
Cooking consistency is another massive benefit. Uniformly sized food pieces cook at the exact same rate. This principle is critical when you roast vegetables or simmer hearty stews. If you chop potatoes unevenly, the small pieces turn to mush while large chunks remain raw inside. A standardized blade grid guarantees identical cubes every single time. Your roasted root vegetables will achieve perfectly even caramelization.
Safety considerations also drive the popularity of these devices. Professional chefs operate razor-sharp blades safely due to extensive training. Home cooks experience finger slips far more frequently. An enclosed device keeps your fingers completely separated from the cutting surface. You simply place the ingredient on the grid and press down. Just ensure your chosen model features a rubberized, non-slip base. A stable foundation prevents the unit from sliding across your wet countertops during use.
Core Evaluation Criteria: How We Assess Quality
Blade Durability and Material Construction
The cutting surface dictates the entire lifespan of your device. Always look for 420-grade or 304-grade stainless steel. These specific metal grades resist rust effectively while maintaining a sharp edge. Cheap materials dull rapidly and begin crushing your food. We evaluate blades using the classic "Tomato Test." A high-quality blade pierces the tough tomato skin instantly. A poor blade smashes the skin, ruining the flesh underneath. You can identify a robust grid by examining the cross-sections. The metal strips should feel rigidly locked in place.
Cleaning, Maintenance, and Sanitation
Cleaning difficulty ruins the convenience of many kitchen tools. Food particles inevitably get stuck inside the top pusher teeth. This is the biggest point of failure for daily usability. If you spend ten minutes digging out onion skin, you saved zero time. Evaluate units based on their included cleaning accessories. Custom claw brushes are absolutely vital. These small plastic rakes push debris out of tight corners safely. Additionally, check the dishwasher safety ratings. You must place plastic trays on the top rack exclusively. Bottom rack heat elements will warp the plastic permanently.
Capacity and Storage Footprint
Consider the relationship between catch-tray volume and your available kitchen space. Standard devices offer around 1.2 liters of capacity. Bulk-prep models can hold up to 2 liters. A massive tray requires fewer emptying stops while cooking. However, it demands significant cabinet storage. Nesting designs solve this issue beautifully. The best models allow you to store all sharp interchangeable blades securely inside the main catch tray. This keeps your kitchen drawers organized and protects your hands from loose blades.
Material Safety and Ergonomics
Food contact requires strict safety standards. Mandatory BPA-free, food-grade plastics are essential. Look specifically for ABS plastic construction. ABS offers superior structural integrity against repeated downward impacts. Ergonomics play an equally vital role. Downward force requires leverage. If the unit slides, you risk injury or breaking the device. A heavy-duty rubberized ring around the bottom base is crucial. It grips the countertop firmly, allowing you to press down confidently and safely.
Top Vegetable Chopper Categories to Consider
Manual Press-Down Choppers (The Dicing Standard)
These devices feature a top lid pressing ingredients through a stationary metal grid. They stand as the industry standard for creating perfect geometric cubes.
- Best for: Standard weekly meal prep. They dominate when dicing onions, bell peppers, zucchini, and cucumbers.
- Pros: You get highly uniform cuts every time. They operate silently and require no electricity.
- Cons: Users must apply moderate physical downward force. Dense items require a swift, firm pressing motion.
Pull-Cord / Rotary Choppers (The Mincing Specialists)
These compact bowls house spinning blades connected to a manual pull-cord mechanism. They act like hand-powered food processors.
- Best for: Mincing garlic, chopping fresh herbs, crushing nuts, and whipping up quick salsas.
- Pros: They are incredibly portable and easy to store. They require very little physical strength to operate.
- Cons: They do not produce uniform cubes. The longer you pull the cord, the more unevenly they mince the ingredients.
Electric Mini-Choppers (The Heavy-Duty Option)
These motorized units eliminate all manual labor. They rely on small but powerful motors spinning tiered blade systems.
- Best for: Processing tough root vegetables, blending purees, and handling high-volume tasks for large families.
- Pros: Zero physical effort is required. They process dense foods in mere seconds.
- Cons: They require a wall outlet and occupy more counter space. It is also harder to achieve a precise dice without turning soft vegetables into mush.
Top Picks by Budget and Use Case
Selecting the right tool depends heavily on your expectations and spending comfort. Below is our categorized breakdown of what to expect at different price tiers.
Category Overview Matrix
| Category Tier | Price Range | Ideal User | Primary Benefit |
| Reliable Basic | Under $25 | Casual Cooks | Affordable, easy onion dicing |
| Meal Prep Workhorse | $25 - $50 | Weekly Preppers | Maximum versatility, high capacity |
| Premium Electric | $50 - $70+ | High Volume / Arthritis | Zero effort, handles dense roots |
Best Under $25: The Reliable Basic Chopper
A basic Vegetable Chopper usually features a single or dual-blade manual press design. You will not find endless attachments here.
Why it works: It is absolutely ideal for the casual cook. If you simply want to dice onions and soft vegetables without overspending, this tier delivers. You avoid paying for julienne attachments you might never actually use.
Limitations: You must accept a smaller catch tray. Furthermore, the standard plastic hinges may not survive impacts from heavy root vegetables over time.
Best Under $50: The Multi-Blade Meal Prep Workhorse
This mid-range tier introduces the popular 8-in-1 or 12-in-1 systems. These comprehensive kits include dicers, slicers, julienne blades, and sometimes egg separators.
Why it works: You gain maximum versatility for Sunday meal prep sessions. These models usually feature a larger capacity tray, often exceeding 1.2 liters. Manufacturers typically reinforce the back hinges at this price point to handle firmer ingredients.
Limitations: Ownership requires strict kitchen organization. You must carefully store multiple sharp attachments to avoid losing them in deep drawers.
Best Premium Investment: Heavy-Duty Electric Choppers
Moving into the premium category means upgrading to motorized units. These devices often feature thick glass work bowls and dual-tiered spinning blades.
Why it works: They offer superior longevity and excellent motor warranties. You gain the ability to process dense carrots, raw sweet potatoes, and hard nuts without straining your wrists or shoulders.
Limitations: You are tied to an electrical outlet. They carry a higher upfront cost and demand more vertical storage space in your pantry.
Implementation Realities: Common Pitfalls and How to Avoid Them
Even the most expensive prep gadget fails if used incorrectly. Many negative user reviews stem from a misunderstanding of how these tools operate. You can extend the life of your device significantly by avoiding these common traps.
The Pre-Cut Requirement
We must transparently state a fundamental truth: no device eliminates knife work entirely. You still need to halve or quarter large onions and potatoes before processing. The ingredient must sit flat inside the designated blade grid area. If you try to force an oversized, round onion through the grid, the plastic hinge will snap. Pre-cutting creates a flat, stable base for the pusher to strike.
The Hard Vegetable Risk
You must exercise caution around dense root produce. Standard wire-grid press models handle bell peppers beautifully. However, raw sweet potatoes or large, thick carrots pose a massive threat. The density of these items can bend or warp the stainless steel grid. If you need to cube raw sweet potatoes frequently, you should parboil them slightly first. Alternatively, upgrade directly to an electric motorized unit.
Immediate Rinsing Rule
Cleaning procrastination ruins manual choppers. You must discuss the necessity of rinsing the grid immediately after use. Vegetables contain high amounts of natural starches. When potato or onion starch dries on plastic and metal, it acts exactly like industrial cement. Once it hardens, cleaning becomes exponentially harder. A quick 10-second blast of hot water right after chopping prevents this issue entirely.
Conclusion: Shortlisting Your Ideal Chopper
Selecting the best tool comes down to matching the device to your daily habits. Use this final decision framework to finalize your choice. If your budget is incredibly tight and your main goal is simply avoiding onion tears, choose a basic pull-cord or single-grid press model. You will save money and solve your primary problem.
If you dedicate your Sundays to prepping meals for the entire week, invest in a sub-$50 multi-blade press system. The large catch tray and interchangeable slicers will streamline your entire workflow. Conversely, if you deal with arthritis or regularly process high volumes of dense root vegetables, bypass manual options entirely. An electric motor is your best long-term investment.
Your next step is simple. Audit your most frequently cooked weekly meals. Write down the ingredients you chop most often. This quick exercise will instantly determine if you need a dicing tool for perfect cubes, or a mincing tool for rapid, small cuts.
FAQ
Q: Are vegetable choppers genuinely dishwasher safe?
A: While many brands claim full dishwasher safety, hand-washing the metal blades is highly recommended. Dishwasher detergent contains abrasives that dull sharp edges over time. Plastic catch trays are usually safe, but you must keep them exclusively on the top rack to avoid heat warping from the bottom element.
Q: Can a manual vegetable chopper handle sweet potatoes or carrots?
A: It depends entirely on the thickness of the steel blade grid. Generally, raw sweet potatoes are far too dense for cheap plastic press choppers. Attempting this will bend the blades. You should parboil dense roots for a few minutes first, or switch to an electric motorized unit.
Q: How long do the stainless steel blades typically stay sharp?
A: With moderate weekly use and proper hand-washing, a high-quality 420-grade stainless steel grid stays sharp for about one to two years. Most wire-grid blades cannot be manually sharpened at home. Once they begin crushing tomatoes instead of piercing them, you must replace the blade insert.


